

This article details the steps to deploy SCCM clients using group policy (GPO). You can also upgrade SCCM client agents using group policy. You can use different methods to install the Configuration Manager client software. This article describes each method, so you can learn which one works best for your organization. Listed below are all the methods to install the SCCM client agents:
Microsoft recommends using the client push installation method to deploy SCCM clients in the setup. That’s because it is easy and can be used to automatically install the client on all discovered computers.
However, some organizations prefer to deploy SCCM clients using group policy. A GPO works best when you have Windows computers joined to an Active Directory domain.
If you are planning to deploy SCCM clients using group policy, you must uncheck the option “Enable Automatic site wide client push installation” under client push installation properties.
If this option is enabled then the SCCM client agents would get installed automatically on all the systems after its discovery.
To disable Automatic site wide client push installation:

To create a GPO to deploy SCCM clients, you must have necessary permissions. I recommend testing the GPO on a few test machines first. If the SCCM client agent deployment GPO works, expand it to a larger set of computers.
Let’s see the steps to create a group policy to deploy SCCM clients. Login to the domain controller machine or a member server installed with Group Policy Management console.
Launch the Windows Server Manager, click on Tools and select Group Policy Management.
In the GPMC console, right-click your domain and select Create a new policy. Specify the name as deploy SCCM clients using Group Policy.
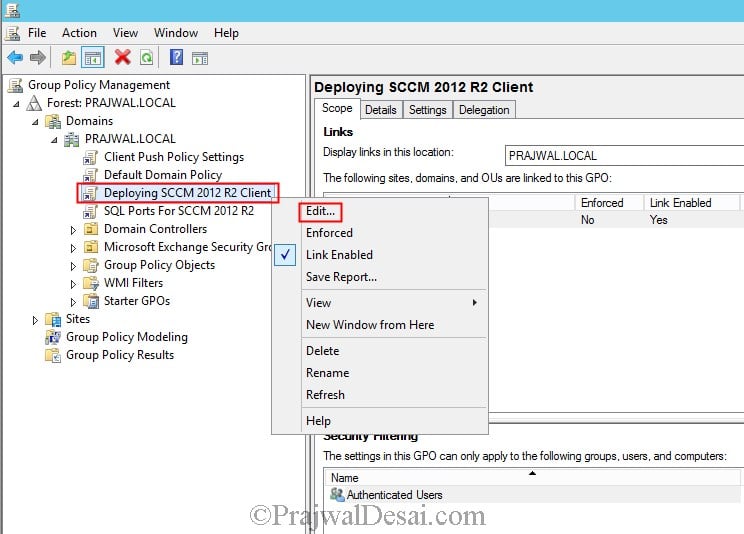
Now right-click the new policy that you just created and select Edit.
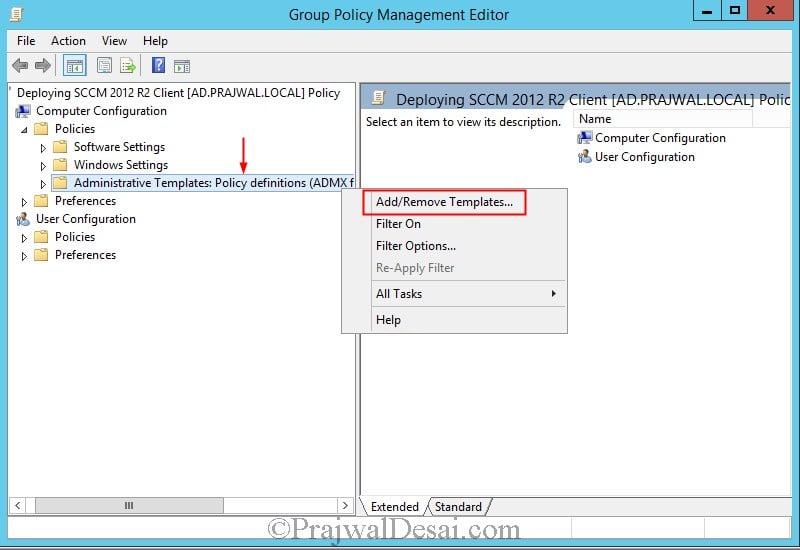
In the Group Policy Management Editor, expand Computer Configuration, Policies and right click on Administrative Templates and click on Add/Remove Templates.
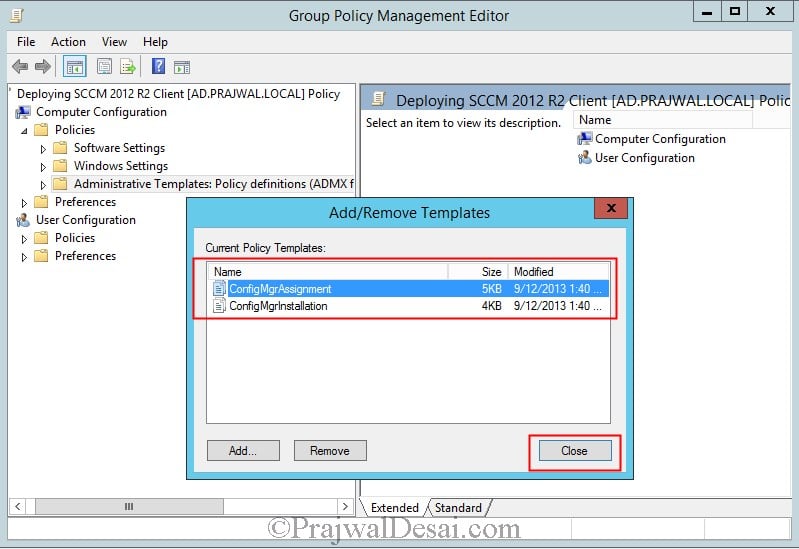
You can add new SCCM client agent templates by clicking on ADD. The Configuration Manager templates can be found in SMSSETUP\TOOLS\ConfigMgrADMTemplates.
You can also add it from :Program Files\Microsoft Configuration Manager\tools\ConfigMgrADMTemplates. You need to add 2 templates ConfigMgrAssignment and ConfigMgrInstallation.
After you add both the templates, click on Close.
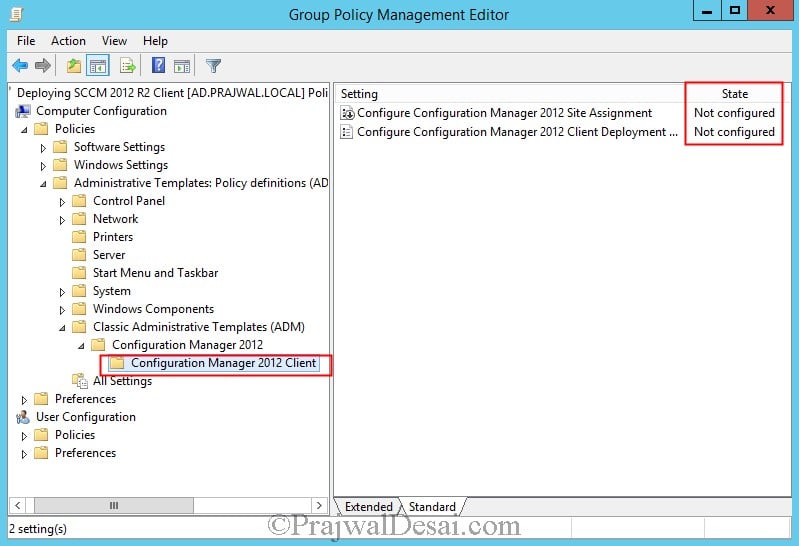
Expand Administrative Templates, Classic Administrative Templates, Configuration Manager, Configuration Manager Client.
Now on the right panel, we see both the Configuration Manager templates have been added. The state of these templates shows it’s not configured.
The next steps will cover the configuration part of the Configuration Manager Templates.
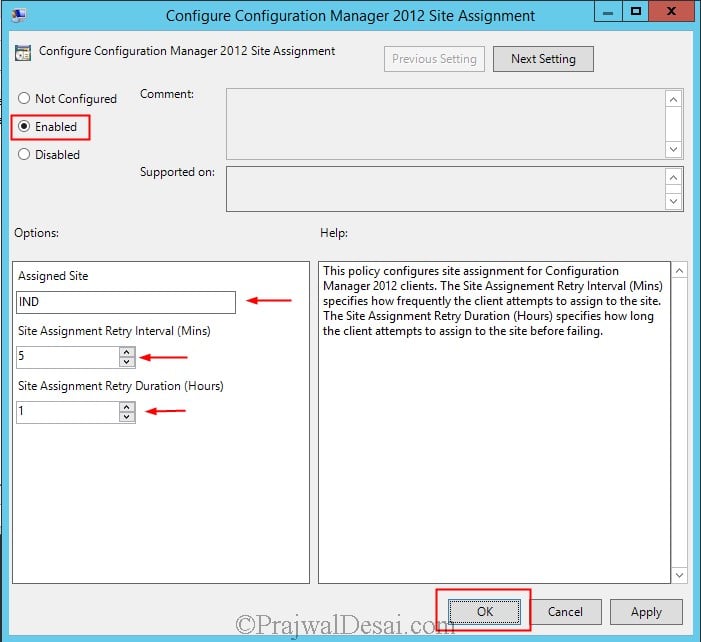
Right click on Configure Configuration Manager 2012 Site Assignment template and click edit. Click Enabled to enable the policy.
Under Options specify Assigned Site code, Site Assignment Retry Interval to 5 minutes, Site Assignment Retry Duration to 1 hour (You can also choose to leave the options to default except site code). Click OK.
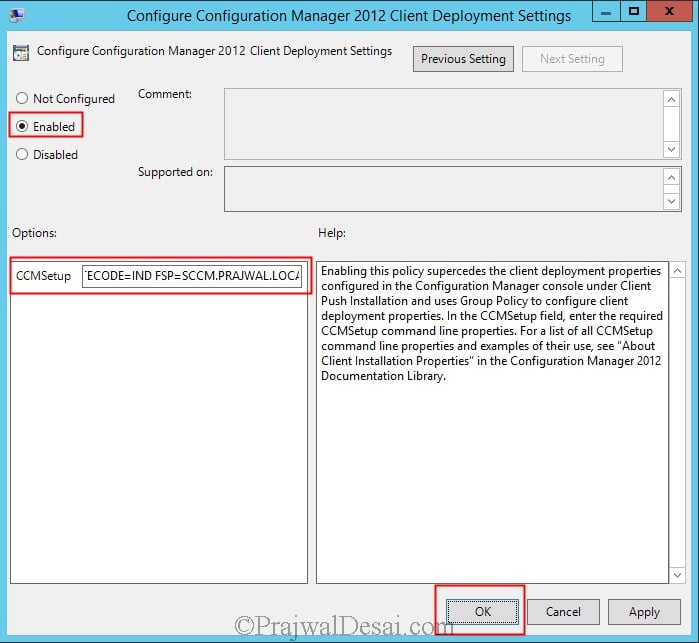
Right click Configure Configuration Manager 2012 Client Deployment Settings and click on Enabled.
Under options specify the installation properties for CCMSetup file. If you provide client installation parameters on the command line, they modify the installation behavior.
In our case, I have used following installation command CCMSetup.exe SMSSITECODE=IND FSP=SCCM.PRAJWAL.LOCAL MP=SCCM.PRAJWAL.LOCAL
Click on OK.
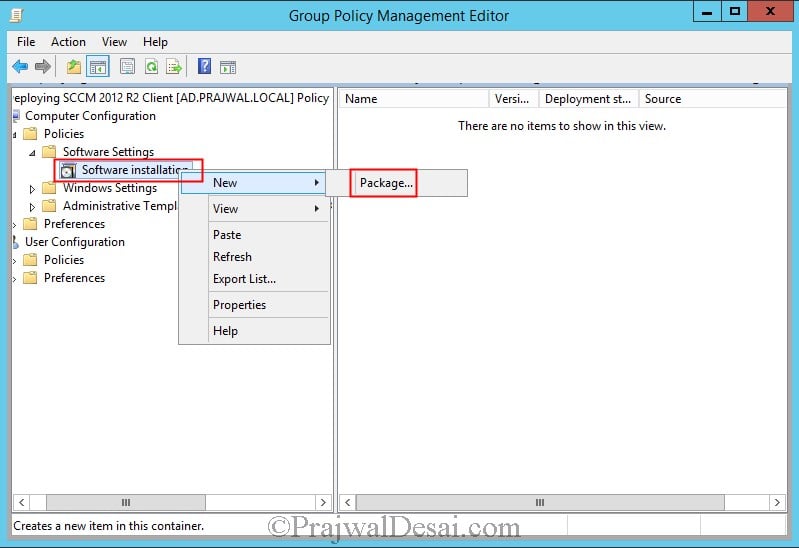
In this section, we will create a new software installation package to deploy SCCM client agent. Under Computer Configuration expand Policies, Software Settings. Right click Software Installation and click New > Package.
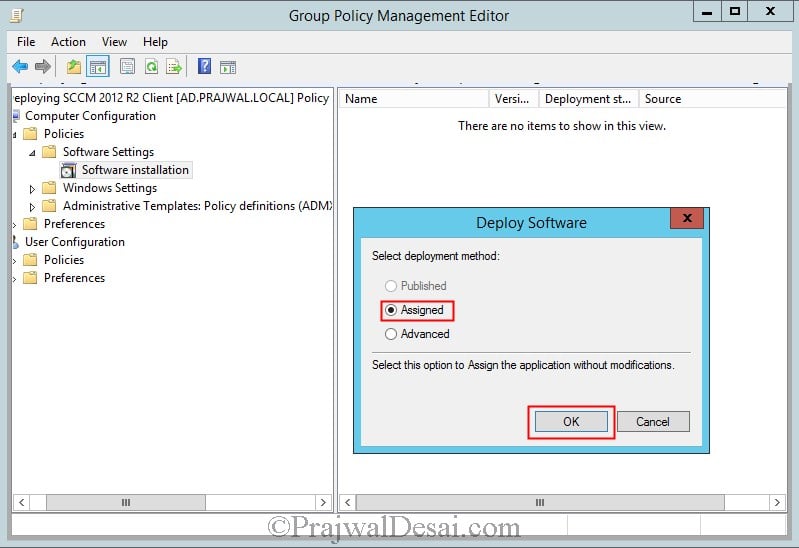
You have to specify or use the ccmsetup.msi as package. The ccmsetup.msi installer can be found in ConfigMgr_Media\SMS\SETUP\BIN\I386. Copy the ccmsetup.msi in a folder (Create a new folder on SCCM Server) and share it with permissions Read-only for Everyone.
Browse the file ccmsetup.msi to the folder that you created and Select the deployment method as Assigned. Click OK.
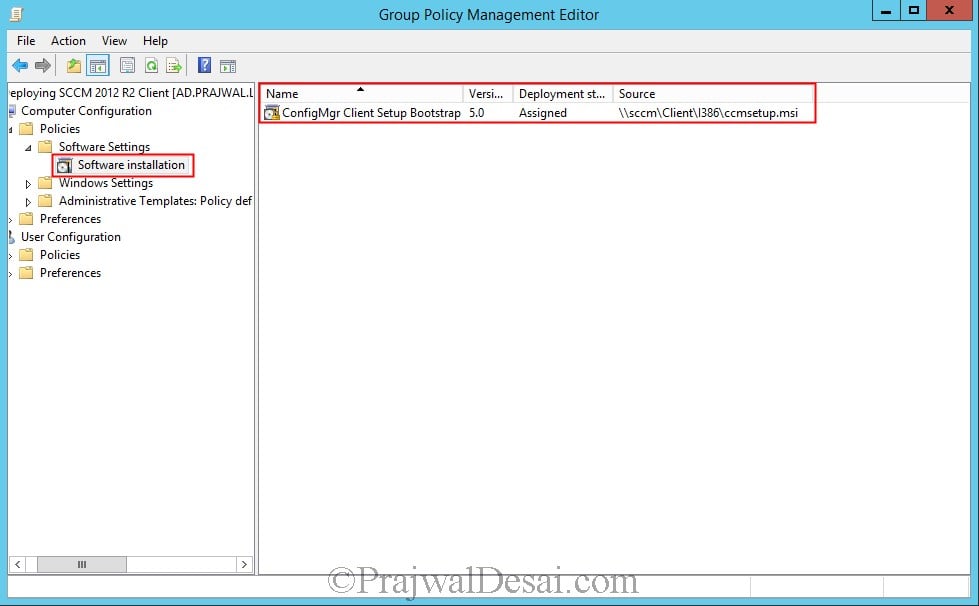
When you click on Software installation, you should see the following details about the Configuration Manager client. The details include Package, its Version, Deployment Status and Source.
The deployment status for ConfigMgr client package is Assigned. Close the Group Policy Management Editor.
In the above steps we created a group policy to deploy SCCM clients. We also configured the ConfigMgr templates. The next step is to apply the group policy to computers.
You can choose to apply this policy at domain level or at OU level. If you apply it at domain level then every computer in your domain will get the SCCM client installation on next reboot.
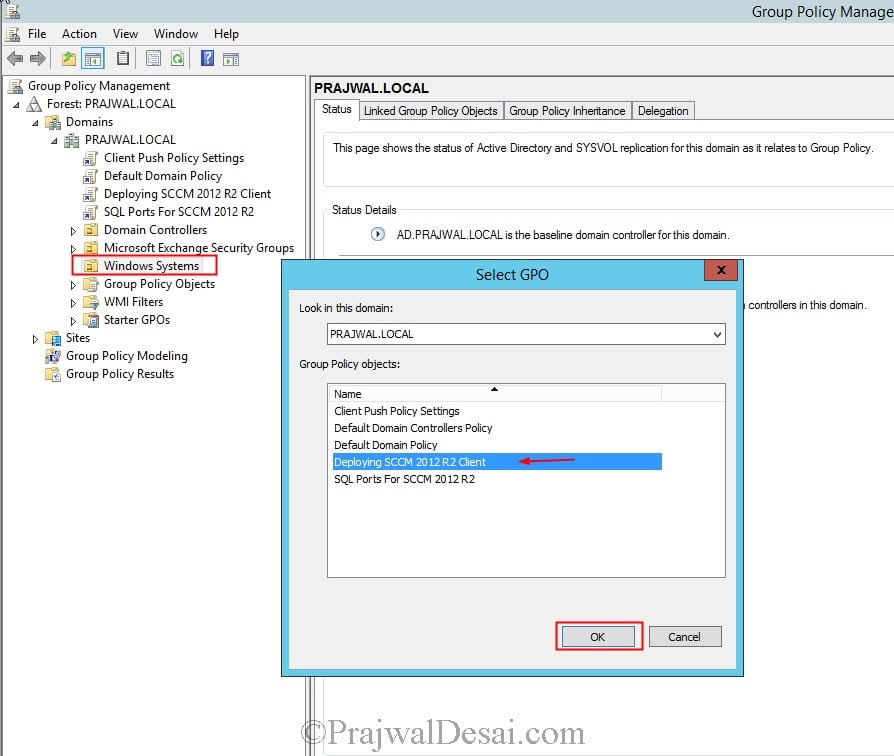
I have created a OU called Windows Systems which consists of client computers. To link the policy to this OU, right click on OU Windows Systems, click Link an existing GPO, choose the GPO Deploy SCCM clients using Group Policy and click OK.
You need to perform gpupdate on domain controller first and then on client machines.
The group policy to install SCCM clients is now applied to your computers. Reboot the client machine, and after you log in to the client machine the configuration manager client installation begins.
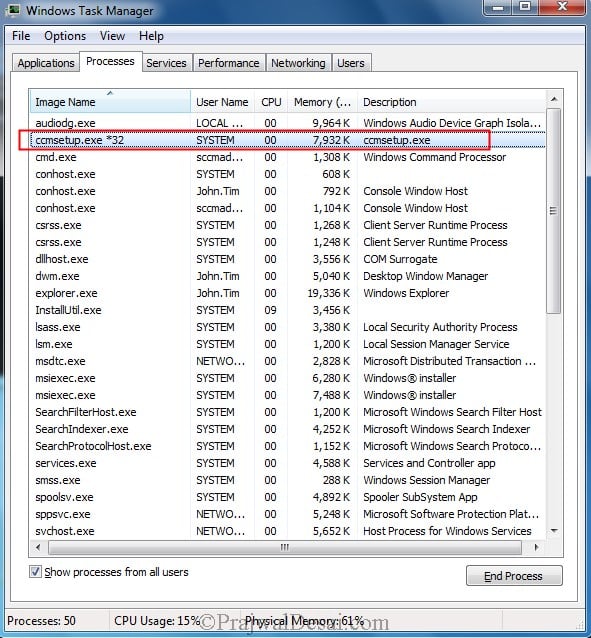
You can see the cmmsetup.exe *32 service running on the computer. This confirms the ConfigMgr client agent installation has begun.
This completes the steps to deploy SCCM clients using Group Policy. If you have any questions, let me know in the comments section.
If you need further assistance on the above article or want to discuss other technical issues, check out some of these options.