
Navigating the world of online tools can sometimes feel like trying to find your way through a labyrinth. But fret not, because today we are tackling one such tool that has become indispensable for many: Google Forms. Google Forms have made it simpler than ever to gather information, conduct surveys, and most interestingly, create quizzes. Whether you're a teacher keen on assessing your students' understanding, a business interested in customer feedback, or simply someone who loves hosting fun trivia nights, Google Form quizzes are your reliable ally. This step-by-step guide will walk you through the process of creating your very own Google Form Quiz. Let's get started!
To get started with Google Forms, you'll need a Google account. You can create one easily by visiting the Google Account homepage and following the prompts. Once you have your account, you can access Google Forms directly or through the Google Workspace.
Google Forms interface is user-friendly and intuitive. The main dashboard gives you an overview of all your existing forms and templates for new ones.
To create a new form, click on the 'Blank' button or choose a template from the gallery. A new tab will open with an untitled form. Start by giving your form a title and a brief description in the appropriate fields.

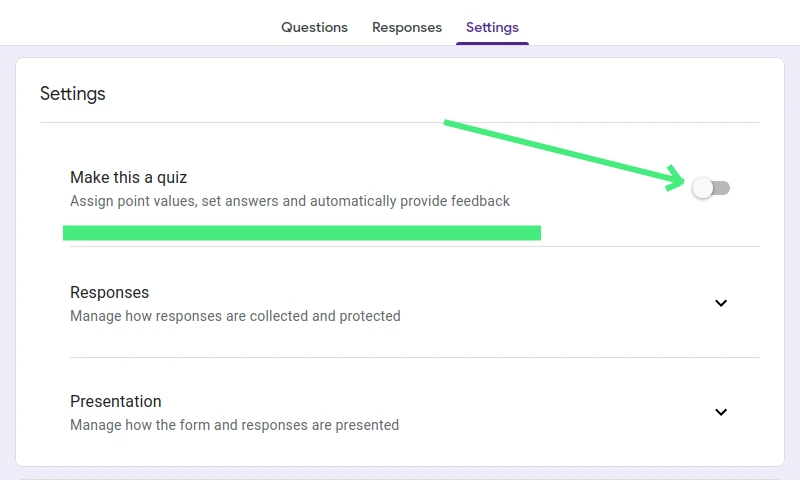
Let's now transform your form into a quiz. Begin by locating the settings tab in the center of your screen. Upon clicking it, you'll see a variety of options within the settings tab. Within this section, you'll find a switch labeled 'Make this a quiz'. Click on it to activate quiz mode. And just like that, your ordinary form is now a fully functional quiz!
The 'Presentation' section in the settings tab of Google Form Quiz contains options that can significantly influence how respondents interact with your quiz. Two noteworthy settings here are the 'Show progress bar' and 'Shuffle question order' options:
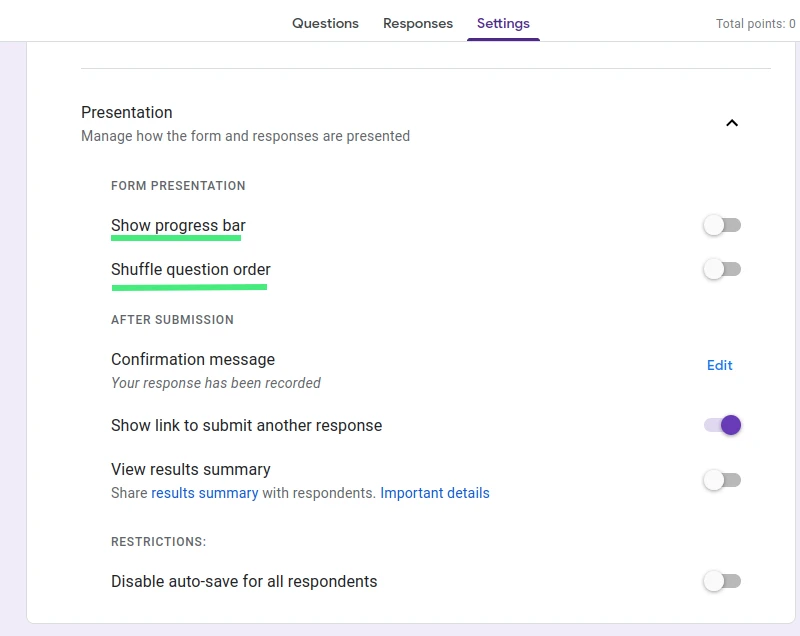
Consideration of these settings can help make your Google Form Quiz more user-friendly and secure, while also keeping the experience engaging for your respondents. As always, the choice to enable these features should be driven by the purpose and design of your quiz.
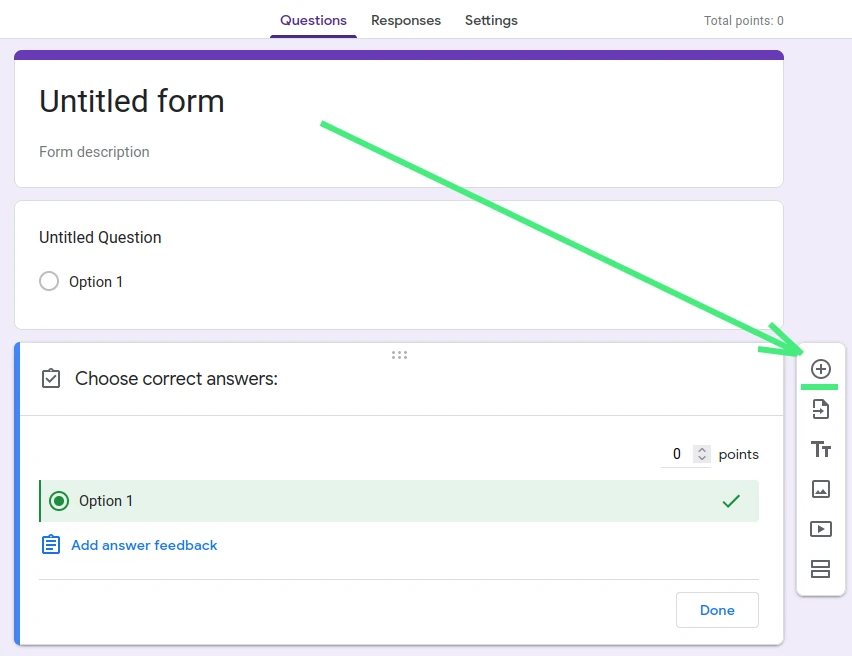
Google Form quizzes can accommodate a variety of question types like multiple-choice, checkboxes, dropdowns, and short answers. Add questions by clicking the 'Add Question' button on the right. Write your question in the provided field and select the appropriate question type. A well-crafted question should be clear, concise, and unbiased.
The choice between multiple-choice questions (where respondents can select more than one answer) and single-choice questions (where respondents can select only one answer) plays a significant role in the effectiveness of your Google Form Quiz. Here's a look at when you might choose one over the other:
Single-choice questions are best used when there's only one correct answer. They're commonly used in tests or quizzes to assess a respondent's understanding of a topic. For example, a single-choice question might ask, "Who is the current President of the United States?" with only one correct option among several.
Single-choice questions are straightforward and easy to grade, making them suitable for larger quizzes where automatic grading is required. They're also useful for forcing a decision when you need a clear-cut response.
Multiple-choice questions, on the other hand, are valuable when more than one answer can be correct, or when you want to assess a respondent's knowledge of a topic in a more nuanced way. For instance, a multiple-choice question might ask, "Which of the following are types of renewable energy?" with several correct options.
Multiple-choice questions can also be useful in surveys or feedback forms, where you want respondents to be able to express all the options that apply to them. For example, "Which of our products have you purchased in the past?"
When constructing your quiz, it's important to consider the nature of the information you're trying to gather and the goals of your assessment. By strategically choosing between single and multiple-choice questions, you can design a more effective and insightful Google Form Quiz.
After creating your questions, it's time to assign correct answers and point values. For each question, click on 'Answer Key' at the bottom. Choose the correct answer(s) and assign points.
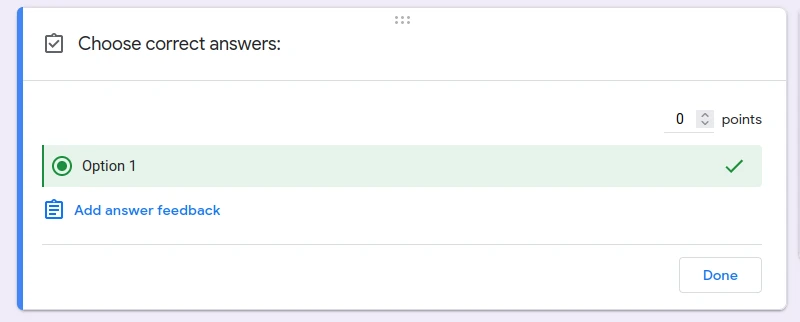
You can also provide answer feedback for learners, which they can see after submission. Providing answer feedback can greatly enhance the learning process for respondents. Here are a few examples:
Using this feature, you can guide your respondents towards the correct answer, and ensure they understand why their answer was incorrect, encouraging learning through evaluation.
Google Form Quiz offers flexibility in customizing settings. In the quiz settings (under the 'Settings' tab), you can decide when students get their grades—either immediately after submission or later, after manual review. You can enable 'Auto-grading' for automatic scoring. If you want respondents to see correct answers after submission, enable 'Release grade' and 'Correct answers'.
Understanding when to use each setting can help maximize the effectiveness of your Google Form Quiz.
Remember, the best approach will always depend on the purpose of your quiz and the nature of your questions. By understanding these options, you can create a Google Form Quiz that best fits your needs.
Once you're satisfied with your quiz, you can share it with your audience. Click on 'Send' in the top-right corner. You can send it directly via email, share a link, or embed it on a webpage. Adjust the 'Collect email addresses' setting as per your needs.
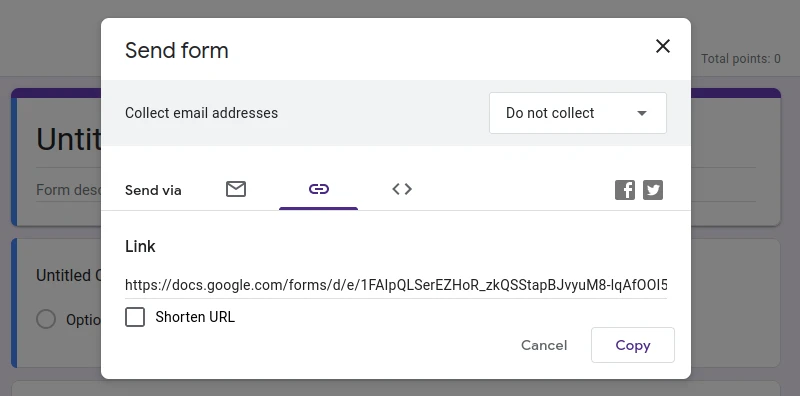
When you toggle this on, Google Forms will automatically collect the email addresses of everyone filling out the form. This is especially useful if you want to follow up with participants or track who has completed the quiz. It adds a layer of accountability, discourages careless responses, and can help in identifying responses if you wish to give specific feedback. Additionally, you can choose whether respondents receive a copy of their responses via email.
Learn more about sharing your Google Form.
Google Form Quiz collects all responses, viewable in the 'Responses' tab. You can see individual responses or an overview of all responses. For a more detailed analysis, it's possible view responses in Google Sheets.
Click on the green icon to to create a new Google spreadsheet or to select an existing one where you'd like the responses to go.
Once you do this, all current and future responses will be automatically recorded in the selected Google Sheets document. This feature is especially useful if you're expecting a large number of responses or if you want to perform detailed data analysis using the powerful tools available in Google Sheets.
By utilizing this feature, you can streamline the process of collecting and analyzing quiz responses, saving you valuable time and providing you with greater insights.
One of the disadvantages of Google Forms as it stands is the inability to limit the time respondents have to complete a quiz directly within the application. This might be important in certain scenarios where you want to mimic real exam conditions or prevent respondents from taking too much time researching answers.
However, this doesn't mean that time-limited quizzes are off the table. You can overcome this limitation by using add-ons designed to integrate with Google Forms. Add-ons such as 'Bolo Forms Timer' can be incredibly useful in this regard. They offer a solution to this issue by providing the functionality to set a time limit for quiz completion.
To use these, you'll need to install the chosen add-on and follow the provided instructions to set it up. Once installed, you can easily set a time limit for your Google Form Quiz, ensuring respondents stick to the allocated time.
Remember, while this might require an additional step, the benefits of a timed quiz can be significant, especially for educational or competitive assessments.
Creating effective Google Form quizzes is an art. Here are some tips:
Google Form quizzes are a powerful tool for a range of applications, from education to business. With this guide, you can easily create, share, and analyze quizzes tailored to your needs. So, why wait? Start creating your quiz today!
We hope this guide on how to make a Google Form Quiz was helpful. If you have any experiences, thoughts, or questions, do share in the comments below. And if you found this guide valuable, feel free to share it with others who might benefit. Happy quiz-making!